People Portal Setup
Setting Up the People Portal
After you’ve become familiar with what a People Portal does, and you’ve decided on the basic design of your People Portal (i.e. what information you’ll provide and who will have access to it), then it’s time to roll up your sleeves and get the Portal set up.
There's a lot here, and we recommend that you tackle it in order. But if you've already been through this and you're just coming back for a refresher on a particular step, you may find these links helpful to jump to where you want to go:
- People Portal home page (content that everyone sees upon arrival in the People Portal)
- People Portal posts
- Changing log-in credentials
- Updating contact info
- View leadership assignments
- Update educational background
- Submit CEUs
- View/print trainings record
- Clergy directory
- Using FormVites in the People Portal
- Using Data Forms to update information
- Clergy Compensation Form in the People Portal
- Access the Church Dashboard from the People Portal
INITIAL SETUP STEPS
Fair warning, things are about to get techie, but don’t be intimidated! You can always give it a try yourself and call Brick River if you get stuck.
Step one, no matter whether you attempt these initial setup steps yourself or not, is to contact Brick River and purchase the People Portal bundle. Then, the appropriate elements will be auto-loaded into your console. From there, either attempt the setup yourself or pay Brick River to do it.
If you'd rather not take the DIY route, just skip ahead to here:
Here’s the techie version:
Create a web page layout for the People Portal.
When logged in as an admin to your Brick River console, go to Site and select Site Layouts from the drop-down menu. Select the green Create new layout button. Give your layout a name and select the website your People Portal will be connected to from the drop-down list. Next, under layout select People Portal - Root (UMC Central Contacts). You may need to search for it for it to appear. We promise, it’s there. In the large textbox on the right, insert the following code to get things started: <body></body>. Then, hit the green Publish button.
Create a user called People Portal Person.
Follow these instructions for creating a new user. Make sure to make them an administrator and set the user to inactive.
Create related web pages.
Go to Site on the top black bar. Under the Site menu, look at the first list with the gray title Manage Pages and select your website. Click on an existing page to reveal the pop-up menu and select New Page from that menu. Best practice is to click on the page that you intend to be the parent page of your new page. Title this page People Portal, and give it the friendly link of peopleportal.
Under the drop-down for Site Layout, choose the People Portal layout you created above. Under the Properties tab, make sure the Hide from menus and Hide from sitemap options are checked. Select the green Publish button.
Repeat these steps to create the People Portal Sign-In Help page. Title it People Portal Sign-In Help, and give it the friendly URL of peopleportalsigninhelp.
Create related views and link them to the People Portal Person user we created above.
Open the Admin menu (the gear in the upper right side of the screen), and select Views from the drop-down menu. Search for the view PeoplePortalLogin. Select it, and using the green New button, create a new permission view of the base view. In the resulting screen, on the upper left there’s a question — Who does this view apply to? — with two radio button options. Select Only specific users or groups, and then, under the Users drop-down, select your previously created People Portal Person user.
If you need to adjust the fields available in this view, you can go back to the base view and use the blue Permissions button to view a more WSYSWYG experience. Learn more about editing data forms in this article.
Now, repeat these steps for the following views:
- PeoplePortalPerson
- CEUsSubmit
- EducationHistorySubmit
Make a branded template for the People Portal.
Under the Reg menu, select Brand Assets and Templates from the drop-down menu. Select the green Add New button in the upper right. Name your template [Your Conference Name] People Portal. Design your template and then select Save. Alternatively, use an existing, conference-branded template.
Make related data forms and run them all as your already created People Portal Person.
Open the Admin menu (the gear in the upper right side of the screen), and select Data Forms from the drop-down menu. Use the green New button to start a new data form. Title your form People Portal CEUs Submit and connect it to the CEUsSubmit view. Select the appropriate template — maybe even the one you created in the previous step — from the drop-down. If appropriate, add a thank you message or a redirection URL. Lastly, and most importantly, in the very last field titled RunAs choose People Portal Person from the drop-down. Select Save.
Repeat these steps and create the following data forms:
- People Portal Login
Corresponding View: PeoplePortalLogin
Redirect: https://www.YOURWEBSITEHERE/peopleportal - People Portal Person
Corresponding View: PeoplePortalPerson
Redirect: https://www.YOURWEBSITEHERE/peopleportal - People Portal Education History Submit
Corresponding View: EducationHistorySubmit
Redirect: https://www.YOURWEBSITEHERE/peopleportal/education
Connect your created forms to your People Portal
Under the Site menu, choose My Websites. Select the name of your website that the People Portal is connected to. Then, jump down to the People Portal section of fields. Set the available fields to reflect the following:
- Contact Update Form to People Portal Person
- Login Update Form to People Portal Login
- CEU Update Form to People Portal CEUs Submit
- Education History Form to People Portal Education History Submit
- Put in text for the pages, if you want
- Check any other boxes or populate other fields as applicable to your conference
Set up backdoor access in the People view
Open the Admin menu (the gear in the upper right side of the screen), and select Views from the drop-down menu. Search for the view People. Click the view to edit. Looking at the source code, scroll down until you see the </Filters> tag. Then, paste the following
<ActionLinks>
<ActionLink Href="https://YOURURLHERE/peopleportal/loginas/" Secure="true" Location="DetailPrimaryToolbar" Label="People Portal" />
</ActionLinks>
Hit Save.
Congratulations, the basic building blocks are in place for your People Portal!
CUSTOMIZING YOUR PEOPLE PORTAL
Once your initial setup is complete, the administrator for the Portal will have back-end access to further customize the design.
But first, you’ll want to sketch out the text of the home page of the People Portal. Remember, there are two types of content in the General Information section:
- Content that everyone sees upon arrival in the Portal
- You’ll design and edit the content as you would for any webpage. Once logged into Brick River, look for Site on the top black bar. Under the Site menutab, look at the first list with the gray title Manage Pages. Then, navigate to the People Portal Home webpage.
- Remember, this content is visible on every People Portal home page, so it’s a good way to supply “how-to” information for navigating the Portal.
- Content that can be targeted to specific groups. These are People Portal Posts.
- You can watch a video here about the steps below.
- To make a People Portal Post, first decide what broad sections you might want to use to categorize your posts. For example, you might want “Conference News,” “Clergy Documents,” and/or “Appointment Announcements.”
- In the Admin menu (click the gear in the upper right corner), choose Categories from the drop-down menu and then People Portal Post Sections from the list that appears. Here, you can add the category titles you’ve chosen, and you can also set a sort order if you’ve named several sections. Hit Save.
- Next, go to the Content menu and choose People Portal Posts.
- Click the green New button to create a new post.
- The Title is what will show on the People Portal home page.
- Enter the Written Date to control the sort order on the home page. The most recent posts will be on top.
- In the Section field, click the drop-down arrow to see the categories you’ve just created, and select the appropriate one.
- You also have the option to choose whether this post is “important.” If the button is toggled to “yes,” a highlighted green box labeled “important” will appear next to the post title on the Portal screen; the “important” label must be toggled off manually.
- Specify the dates that this post will be visible, but you also need to toggle to Visible in order for the post to appear on the specified date.
- For the post itself, you can add a Primary Image (photo), create the text of the announcement, embed a video, and/or link to a URL. Another option is to add a file. For example, the clergy sexual ethics policy or a clergy covenant document.
- Save your post, but you’re not finished yet!
- Who is going to see your post?
- Right now, no one will see it because we haven’t given anyone permission to see it. Permissions are set based on the categories you assign under People Portal Post Sections.
- To get to People Portal Post Sections, under the Site menu, choose My Websites. Select the name of your website that the People Portal is connected to. Then, jump down to the People Portal section of fields and look at the Detailed Sharing. This is where you set permissions for who gets to see what.
- Click on the green box, Add a new People Portal Sharing.
- In the Description of this Share field, give it a name. For instance, you might name it “Posts for appointed clergy.”
- Under the question, Who are you sharing it with? toggle the tag for “currently appointed” if you’re creating a share for everyone appointed; otherwise, select the options to configure the group you’re creating. Note that the share options don’t act as cumulative filters; in other words, if you toggle the tag for clergy to "yes," you’ll get all clergy even if you also select deacon in full connection. If you want a share for only deacons, leave the clergy tag at “no” and just use the conference relationship drop-down to choose the type of clergy you want to include.
- Next, jump down to Post Sections, and select the sections that you want this group to see in their People Portal.
- Hit Save, and now anyone in the group you created will be able to see the post you made when they enter the People Portal.
The real power of the People Portal comes in the targeted tools that appear in the menu box of the left sidebar of the home page of the Portal.
Remember, you have control over which of these resources to put in your Portal and who will have access to which ones. Here’s how to set up each of these options:
Change log-in username and password
- Find the data form called People Portal Login. To do this, look under the Admin menu (gear icon in the upper right), select Data Forms from the drop-down list, then People Portal Login from the resulting list of data forms.
- First, click on Preview this form to get an idea of what people will see when they edit their login information. Then return to your data form to modify it.
- Under Branded Template, choose the template you want to use.
- The redirect field needs to be: https://YOURWEBSITE/peopleportal
- If you want to offer instructions to people who want to change their password, put the text in the header (or footer, if you prefer) box.
- You’ll want to end up with a data form that looks something like this:
- Under the Site menu, choose My Websites. Select the name of your website that the People Portal is connected to. Then, jump down to the People Portal section of fields. In the drop-down for Login Update Form, choose the data form People Portal Login.
- When people click on the “edit login” dropdown in their People Portal (upper right corner), they’ll be able to set their own password.


Update their contact information in their People record or view their contact information, then enter changes into a form from which an administrator can update the People record.
- There are two choices here. The first works for a larger conference where updating hundreds of People records by hand is prohibitive, so it’s efficient to allow people to update their own contact info. The second option is for those who prefer to maintain control over who can edit information in the People records.
- The technique for each option begins in the same way: create a data form, using the view PeoplePortalPerson Contacts.
- To allow people to update their own contact info:
- In the data form, simply choose which fields you want to include for updating, and hide those that you don’t want to show as options. If you need more guidance on how this works, head over to the Creating Data Forms documentation article.
- Use the Header box to create any introductory text you choose.
- Under the Site menu, choose My Websites. Select the name of your website that the People Portal is connected to. Then, jump down to the People Portal section of fields. In the drop-down for Contact Update Form, choose the name of the data form you just set up.
- Anyone who enters their People Portal will now be able to update their own contact information.
- To allow people to view their contact info, then submit corrections:
- Navigate to the People Portal Person View. In the data form, change all the fields to ReadOnly=”true”. Or, using the permissions editor, mark all the fields as hidden or read-only.
- Create a reg form whose fields match the ones in the data form (you can copy and modify this form in the Forms Share library. It’s titled “Update Contact Information”.) Learn more about creating and editing reg forms in this article.
- Set the notifications on the reg form so that the appropriate administrator is notified when people from a particular district (for example) submit the form with changes.
- Adjust the text in the header of your data form to instruct people to look over their contact information and then use the provided link to submit changes. The link will be for your reg form.
- Under the Site menu, choose My Websites. Select the name of your website that the People Portal is connected to. Then, jump down to the People Portal section of fields. In the drop-down for Contact Update Form, choose the name of the data form you just set up.
- Anyone who enters their People Portal will now be able to view their contact information and then submit changes to be updated by the appropriate administrator.
View their own leadership assignments (past assignments as well as current ones).
- Under the Site menu, choose My Websites. Select the name of your website that the People Portal is connected to. Then, jump down to the People Portal section of fields. Scroll down past the Detailed Sharing grid to the text box labeled Assignments Page Text. Use this space to type any introductory language about the leadership assignments. Save the changes.
- Next, decide who is going to have access to their leadership assignment list. An example might be all clergy who are currently appointed.
- Scroll back up to the Detailed Sharing grid, and click on the green Add a new People Portal Sharing button.
- In Description of this Share, give it a simple but clear title, such as “All Clergy Currently Appointed.” In the future, you will be able to use this same share to allow this same group of people to access another element – without creating another new share.
- For our current example, toggle the switch to "yes" for both Tagged Clergy and Currently Appointed. In the Other section, toward the bottom of the new People Portal Sharing interface, toggle the Assignments button to yes.
- Save the new share, and then you’ll see it as a new row in the Detailed Sharing grid. If you go to the People Portal of a clergyperson under appointment, you should see a link to that person’s leadership assignments in the left sidebar.
Update their educational background
- Find the data form called People Portal Education. To do this, look under the Admin menu (gear icon in the upper right), select Data Forms from the drop-down list, then People Portal Education from the resulting list of data forms.
- First, click on Preview this form to get an idea of what people will see when they update their educational background. Then return to your data form to modify it.
- Under Branded Template, choose the template you want to use.
- The redirect field needs to be: https://YOURWEBSITE/peopleportal/education
- Under the Site menu, choose My Websites. Select the name of your website that the People Portal is connected to. Then, jump down to the People Portal section of fields. Scroll down past the Detailed Sharing grid to the field labeled Education History Form. Select the name of the data form: People Portal Education.
- In the next field, Education Page Text, type any introductory language that you want people to know about how to update their education history.
- Decide which group of people you want to be able to update their educational background. Scroll back up to the Detailed Sharing. If your group is the same as one you’ve already created in a previous share, you can simply open that share, and toggle the switch on Education History to "yes." If you have a different group in mind, create a new share as above.
- Note that if you prefer that your people can only suggest changes or updates, to be input by an administrator, follow the guidance in the section above about updating contact information via a reg form submission.
Submit CEUs; view and print reports
- Find the data form called People Portal CEUs Submit. To do this, look under the Admin menu (gear icon in the upper right), select Data Forms from the drop-down list, then People Portal CEUs Submit from the resulting list of data forms.
- First, click on Preview this form to get an idea of what people will see when they submit their information. Then return to your data form to modify it.
- Under Branded Template, choose the template you want to use.
- The redirect field needs to be: https://YOURWEBSITE/peopleportal/ceus
- If you use the CEUs or Lifelong Learning Type field in your data form, you’ll also need to populate the choices for that drop-down:
- Under the Admin menu (gear icon in the upper right), select Categories from the drop-down list, then CEU types from the resulting list of category lists. Create each new type of CEU that you want to include.
- Under the Site menu, choose My Websites. Select the name of your website that the People Portal is connected to. Then, jump down to the People Portal section of fields. Scroll down past the Detailed Sharing grid to the field labeled CEU Form. Select the data form titled People Portal CEUs Submit.
- In the next field, CEUs Page Text, type any introductory language that you want people to know about how to update their CEUs or Lifelong Learning hours.
- Decide which group of people you want to be able to update their educational background. Scroll back up to the Detailed Sharing. If your group is the same as one you’ve already created in a previous share, you can simply open that share, and toggle the switch on CEUs to "yes." If you have a different group in mind, create a new share using the instructions above.
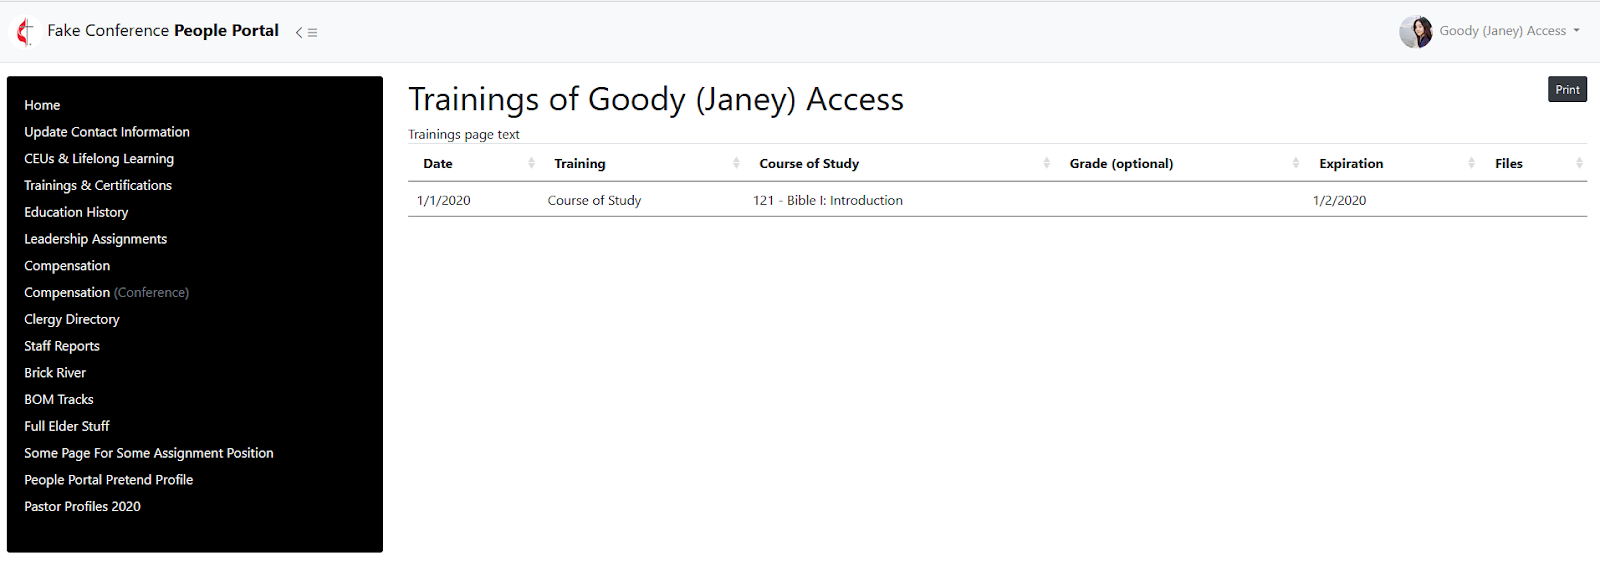
View and print a record of their trainings
- Different conferences use the Trainings section of the People record a bit differently, but whether it’s a record of compliance with ethics requirements or a list of Course of Study classes completed, it can be useful for the clergyperson to be able to see their own record.
- Under the Site menu, choose My Websites. Select the name of your website that the People Portal is connected to. Then, jump down to the People Portal section of fields. Scroll down past the Detailed Sharing grid to the field labeled Trainings Page Text. Type whatever explanatory text will be helpful for your clergy to understand about what they will see on the Trainings List. This is also a good place to point out that they will have the option to print their own list by clicking on the button in the upper right corner of the screen that displays their list via their People Portal.
- Decide which group of people you want to be able to update their educational background. Scroll back up to the Detailed Sharing. If your group is the same as one you’ve already created in a previous share, you can simply open that share, and toggle the switch on Training to "yes." If you have a different group in mind, create a new share using the instructions above.
View a directory (photos and contact info) for all conference clergy
- The People Portal is a great place to house your clergy directory because you can control access to it, which means you can provide personal information including photos and contact information, even for clergy who are retired or on leave and don’t have a church email or phone number.
- The default clergy directory pulls information directly from the People records. It’s a good idea to give a few insiders access to it first to figure out if there are clergy pulling into the report that shouldn’t be there or if the fields you use in the appointment record, for instance, are displaying in an unhelpful way. After you’ve fixed any data entry problems, you’re ready to assign the directory into specific People Portals.
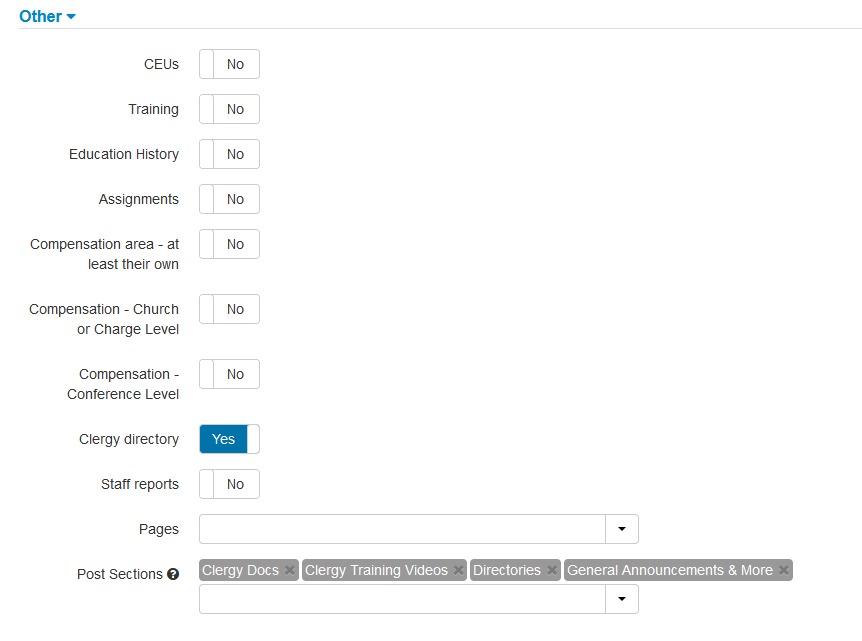
- Under the Site menu, choose My Websites. Select the name of your website that the People Portal is connected to. Then, jump down to the People Portal section of fields. Scroll to the Detailed Sharing grid. If you already have a share set up that gives permissions to the exact group you’re using for the clergy directory, you can simply edit that share; otherwise, create a new share. Either way, assigning the clergy directory is a simple matter of toggling the button to "yes" for Clergy Directory (under “Other”).
Use FormVites to provide access to a variety of resources
- These resources would typically be reports or forms to be completed by a specific group of persons. Using FormVites in the People Portal allows you to make the form/report available to all those persons (but only those persons) who need to complete it. You can also make it available only during the period of time when completion is expected.
- Example: You want all your Honorably Located clergy to complete their annual report during charge conference season.
- Create a reg form that contains the fields needed in the report.
- In the FormVites tab, set up your FormVite and choose the Honorable Location reg form you just created. See this article for more details on creating a FormVite.
- Once you have the FormVite set up, add your invitees (in this case, it would be all persons in your People records with a current clergy status of “HL” and “HR”), but do not email the invitation.
- Under the Site menu, choose My Websites. Select the name of your website that the People Portal is connected to. Then, jump down to the People Portal section of fields. Look for Detailed Sharing and click on the green box, Add a new People Portal Sharing.
- Name this share, for instance, “Annual Reports.”
- Note that you can use this same share for all types of annual reports. Simply add the appropriate FormVite to the share. The target audience is controlled by the FormVite itself, rather than filters within the share, which means that you can use that share for more than one FormVite.
- Scroll down to People FormVites and select the name of your FormVite. Then Save the new share.
- It will now appear in the Targeted Information area, in the left sidebar, on the People Portal home page for everyone included in the FormVite invitation list.
- Anything that can be accomplished via a reg form can be made into a FormVite and linked into the People Portal for the specific groups who need that form.
Use Data Forms to update information such as a clergy profile
- To invite clergy to update their clergy profile in the Appointment Tool:
- Create a data form, choosing the fields that you want clergy to update from the Appointment Tool view. If you’ve read this far, we’re assuming that you’re a pro at making data forms now.
- Assign this data form in the Detailed Sharing grid. Either use a current share, or create a new one. Under People, Forms and FormVites, link the data form that you’ve just created. Again, if you’re new here, scroll up a few sections to see how to access the Detailed Sharing grid and to create a new share or edit an existing one.
Submit and sign information for the clergy compensation form
If you’re using the Brick River compensation form module, you probably already know how to have your clergy and churches access this through the People Portal. If not, here are a few quick tips:
- Create a new leadership assignment called Comp Admin: local church.
- For each person who needs access to the comp form through the People Portal, give them a leadership assignment in their People record of Comp Admin: local church, and link their local church in the assignment.
- Create a New Detailed Share labeled Comp Admin: local church, and set it for a current assignment position of Comp Admin: local church, and then toggle these two fields to YES: Compensation Area - at least their own, and Compensation - church or charge level.
- You’ll also need to follow a similar process for your conference-level compensation administrators. Again, these steps will likely be covered when Brick River sets up your comp form module.
Jump directly to their church’s dashboard to complete charge conference forms
- If you’re using the Church Dashboard tool, you have the option of linking to it from the People Portal.
- It can be handy to create a New Detailed Share for pastors currently appointed to churches and then toggle the Church Dashboard button to "yes."
- When the pastor goes to their People Portal, they’ll see a link to the church(es) they are serving, which will take them directly to the appropriate Church Dashboard.
The last step will be putting the link to the People Portal somewhere accessible, probably on your website. But before you do that, you’ll need to strategize about how to roll out the People Portal to your community.